Tuesday, July 26, 2011

Chocolate Spiral Rolls


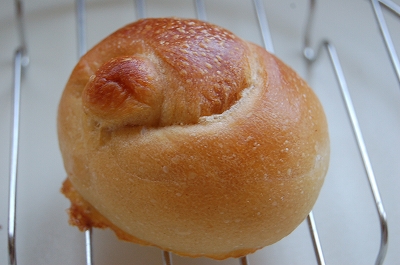
I made chocolate layered rolls.
It looks Cinnamon rolls. But this is layered with chocolate sheet, folded with the dough like croissant. It is easy to make the sheet. I make double of amount, then I keep half in the freezer. It keeps well.
I want to try to make other flavors....like caramel, coffee, strawberry, green tea.... It could be lots of variation!

The sheet contains only few amount of butter, so it is much easier to fold than croissant. It has to be cold before fold with dough. So make it at first, then keep it in the fridge.
The dough is quite rich. It contains egg, sugar and butter. It needs to knead well.
Chocolate Spiral Rolls
Chocolate Sheet
★15g High grade flour
★5g Corn starch
★10g Cocoa powder
★30g Sugar
60cc Milk
70g Dark Chocolate (chopped)
1 Egg white
10g Butter

1. In a microwave-saved bowl, sift ★ingredients and combine well.

2. Add milk and stir with whipper well.

3. Heat it by microwave for 1 minute at 700w.  Stir well. Add chocolate, combine together and melt chocolate.

4. Add egg white and combine well. (At first stage, it might be hard to combine. But just keep stir with whipper. it becomes like liquid.)
5. Heat it by microwave for 1 1/2 minutes at 700w.

6. Mix with spatula. It becomes a dough. If it didn't, heat it up more.
7. Place it on the plastic wrap and cover with another plastic wrap. Roll it 15cm x 20cm, put it into the fridge.


Dough
250g High grade flour
65g Plan flour
35g Egg(beaten)
175cc Water
3 Table spoon of Skim milk
30g Unsalted Butter(melted)
30g Sugar
1 Tea spoon of salt
4g Active dried yeast
1. Place flour, egg,water, milk powder, yeast, sugar and salt in the bowl of a stand mixer. Mix for about 7 minutes. Add butter and mix for another 6minutes. The dough becomes very soft and extensible, elastic. It can be stretched a paper thin“windowpane” .
2. Transfer the dough to a covered container and ferment at warm room temperature (about 27℃) for 1.5 - 2 hours.

3. Pour the dough onto the floured counter, then deflate it, knead it briefly.

A. Roll it out 30cm x 20cm . Place the chocolate sheet on the dough.
B. Fold the dough upside and down side, as trying not to put air in.


C. Turn the dough 90°. Roll it out 60cm wide.
D. Fold right and left side evenly, make 2cm space in the middle.

E. Fold it over, you will know why it needs 2cm space in the middle at photo D. Roll it out with the rolling pin, 28cm(X) x 47cm(Y).
F. Roll the dough. Apply water on the edge of the dough and seal it.

4. Cut the dough into 2.5cm slices. Cut off the edge at first. Place them onto a baking try (put baking sheet).

5. Place it into warm place with cover, rise them for 1 hour.

6. Meanwhile preheat the oven at 200℃.

7. Bake them at 190℃ for 20minutes till it becomes golden brown.
8. Cool them down on a wired rack.

Monday, July 4, 2011

Shaping Rolls

Here, I show you how to shape nice 3 kinds of rolls.  Small pieces of bread are versatile, you can make sandwich for breakfast and lunch, and you can serve them with dinner.

After 1st proofing, divide the dough into small pieces. Make them rough balls and set 15 - 20 minutes.

At first, how to make a basic cylinder before shape the dough.


1. Press the dough with your palm or rolling pin.
2 & 3. Fold down little by litte.
4. Roll and seal the edge.
5. Set them 15 minutes before shaping.

Knots Shape

 
1. At first, roll the basic cylinder dough into 20cm and wrap around.
2 & 3.  Push the tail A through the middle.
4. Put it on the baking try as hiding another tail underneath.

Double Knots Shape


1. Roll the basic cylinder into 28cm. Use left tumb and wrap around.
2 & 3. Push the tail through into the hole.
4. Put it on the baking try as hiding another tail underneath.

Knut Shape

1. Roll the basic cylinder into 20cm. Use left tumb and wrap around.
2 . Push the tail through into the hole.
3.  Fold the another tail. Push and seal with the tail(2).
4. Put it upside down on the baking try as shaping nicely.

And I got Butter roll recipe. You can find another roll shaping here→Butter Rolls

Sunday, July 3, 2011

Butter Rolls

I made Butter Rolls. It is contained rich butter and egg. Soft crumble and rich taste. It takes a few minutes to shape, so it is suitable for something special meals. In japan, we call it Butter rolls. I used to have them as sandwich for breakfast or lunch.


You can create other shapes as you want. I got recipe how to shape other rolls, here.

I made roll shape. I write down how to make roll shapes on the recipe.
It contains 15% of butter. So bake them for short time at high temperature. It makes soft texture and nice coler. Just be careful not to overbake.

Butter Rolls
Polish
50g High grade flour
50cc Water
1 tea spoon of sourdough

Final dough
180g High grade flour
5g Salt
35g Sugar
10g Skim milk powder
45g Egg
45g Non salted Butter (melted)
80g Water
 
Egg Wash
Egg + Milk

1. In a container, mix all the poolish ingredients until just combined. Cover the container and let the poolish ferment at room temperature for about 12 hours or overnight. The poolish is ready to use when the surface is creased, and pebbled with bubbles.
 
2. In a large bowl, mix final dough flour and salt, sugar, skim milk powder. Add sourdough starter and egg, water. Mix with your finger combine the ingredients till water and flour combined well.

3. Place the dough onto the floured counter, then knead it for 10 minutes. Add melted butter, knead it another 10 minutes till it becomes smooth and elastic. (At frst, it might be stiff. But after add butter, the dough becomes elastic.)

4. Put the dough into a container with cover, place it warm place (35℃) till it becomes double size (about 8-12hours). I set overnight.

5. Pour the dough onto floured counter, then deflate it, knead briefly. Divide into 50g each. Shape them into rough balls.

6.Set the dough with cover for 20 minutes.

7. Shape into the rolls.

①Deflate and make it round.
②Fold up and bottom side.
③Fold over and seal it.
④Roll one side and make it like photo⑤.

⑥Set them with cover for 5 minutes.

⑦Press the head side and stick it on the counter.
⑧As pulling the tail side, roll down with a rolling pin.
⑨Then roll up as hold the tail side.
⑩Roll and roll over, make it about 25cm tryangle.

⑪Fold the head side little.
⑫Roll down as pulling the tail side.
⑬Place them onto a baking try (put baking sheet). The tail have to be bottom.

8. Place it into warm place with cover, rise them for 1 hour or 1.5 hours.

9. Meanwhile preheat the oven at 230℃.

10. Brush egg wash and bake them at 220℃ for 10-15minutes till becomes well brown.

11. Cool them down on a wired rack.

Tuesday, June 21, 2011

Cream Pan (Custard Cream Buns)

Cream Pan is one of Japanese pastry bread, filled with custard cream. It is very popular in Japan. Rich sweet  dough and vanilla custard cream.

Its shape is something like glove traditionally. I arranged it, Dose it look better?


Custard cream sold at super market is too soft for filling. I made custard cream by myself. I added more flour and corn starch. When cream gets cold, it is easy to handle and fill in the dough.
The dough contains milk powder, egg and butter. Brush egg wash, make it golden color. But don't bake it too long. Otherwise it becomes over baked and cream is coming out.

Cream Pan (make 8)
Custard cream filling
2 Egg yolks
50g Sugar
200ml Milk
1 tea spoon of Vanilla beans
25g Butter
25g Flour
10g Cornstarch

1. Heat milk in a sauce pan.

2. In a bowl, whiten egg yolks, then  add sugar and flour, cornstarch. Add heated milk in the bowl gradually as string.
3. Filter the mixture, put it back to the sauce pan. Add vanilla beans (or extract)
4. Cook it over low heat string constantly.
5.Stir until thick constantly. Remove from fire,
6. Pour into another container, cool it down. Place it into the fridge.


Dough
250g High grade flour
3g Active dried yeast
50g Sugar
3g Salt
10g Milk powder
25g Egg
130cc Water
25g Butter

Egg + Milk = Egg wash

1. In a bowl, dissolve yeast in lukewarm water. Add egg.


2. In another large bowl, combine flour, sugar, salt and milk powder. Stir well to combine with mixture of yeast water. When the dough has pulled together, turn it out onto a lightly floured surface and knead until smooth and elastic, about 5 minutes. Add softened butter into the dough, knead it until smooth and elastic, about 10 minutes.(Add more flour if it is too sticky.)

3. Put the dough into a bowl with cover, place it warm place (35℃) till it becomes double size, 1.5 - 2 hours.

4. Pour the dough onto the floured counter, then deflate it, knead it briefly, divide it into 8 pieces (60g). Make them rough ball, and set the dough with cover for 20minutes.

5. Punch the dough, make a round shape with a roll pin.


①Make a 14cm x 10cm oval with the rolling pin.
②Put 30g of ball preshaped custard cream on the dough. (about 1/3 upside) Cut the bottom side into 8 - 9 lines.

③Cover the filling and seal tightly. (Make sure to seal tight enough. Otherwise cream comes out when it is baking. )
④Then cover the other side nicely.


6. Place them into the warm place(35℃) for 45 - 50 minutes.
Meanwhile, preheat the oven at 210 ℃。Before bake, apply egg wash.


7. Bake them at 200℃ for 15 minutes, until golden brown.

8. Cool them down on a wire rack.

Sunday, June 19, 2011

Avocado Oil Ciabatta

Today, I made Ciabatta with Avocado oil.

Avocado oil is made in New Zealand. It is quite strong flavor and green color.
I use it for salad, dipping and bread! I love slices of bread with avocado oil.

Ciabatta is No-knead bread, that is simple to make. Just stir all ingredients with spatula in a bowl.
At first, the dough is very sticky. Proofing 1hour and 2 hours later, fold the dough for couple of times.  It is difficult to handle the dough, because it contains 70% of water. I set the dough on the baking sheet during the second proofing. I can transfer the dough with the baking sheet as keeping the nice shape and air bubble.
It took 2 days to make it. Making polish, proofing final dough... I set it overnight. Time makes gluten development well.
Crispy crust and chewy crumble. Ideal for sandwich and panini.

Ciabatta (make 1 loaf)

Polish
200g High grade flour
200g Water
1 tea spoon of sourdough starter
(or pinch of active dried yeast)

Final dough
300g High grade flour
10g Salt
20g Avocado oil(or olive oil)
210cc Water
All of Polish

1. In a container, combine flour, water and sourdough starter and stir. Set it 6-10 hours to ripen at room temperature.

2. In a large bowl, combine flour and salt. Add sourdough starter and water, avocado oil. Mix with a spatula, combine the ingredients till water and flour combined well.

3. Put the dough into a oil sprayed container with cover, place it room temperature. 1 hour and 2 hours later. fold the dough on the floured counter. Put it back to the container, then set it  till it becomes double size (about 8 - 12hours). I set overnight.


4. Turn the dough out onto a very well floured counter.

5. Shaping from the center towards the edges, very gently stretch the dough into a rectangle about 2 cm in height. Try not to degas the dough. Keep the air bubble in.
Gently, put the dough onto a well floured baking sheet. Put the boxes on both side to keep the shape.


6. Proof the dough with plastic cover for 1.5 - 2 hours at the room temperature until the dough is very light and full of gas.

7. Meanwhile, preheat the oven and a baking pan at 240℃ with steam.

8. Take the baking pan out, transfer the dough with baking paper on it. Bake it 230℃ with steam for 8 minutes, then 20 minutes without steam or crust becomes well golden brown. Turn off the oven, crack the door, and keep it inside for another 5 minutes.


9. Cool it down on the wired rack.

Thursday, June 9, 2011

Seaweed rolls

Do you know about Japanese style bread?
French, German, Italian, American...these are famous style of bread. Everyone knows that.
We, Japanese, eat rice with meal traditionally, but eat lots of bread for breakfast, lunch and for tea.
We create own Japanese style bread and pastry.

Today, I made seaweed rolls. It is real Japanese taste. Because it is created by me... I am Japanese.

It contain 80% of white flour and 20% of rice flour. Rice flour make bread resilience texture. And we like to eat seaweed with rice.
I added soy sauce and butter, sesame seeds for flavor. I recommend soy sauce and butter combination. It is so savory taste and aroma. I didn't add salt, because say sauce contains salt.
Ops, yes, of cause I added seaweed. It makes it dark green color.


What do you think about this bread??

Seaweed Rolls
240g High grade flour
60g Rice flour
10g Sugar
20g Sesame seeds
3g Instant dry yeast
3 Sheets of Seaweed sheet
180cc lukewarm Water
10g Soy sauce
30g Butter( melted )


1. In a small bowl, tear seaweed sheet to pieces and add 180cc lukewater. Leave it about 15minutes. It becomes paste. Then add soy sauce and mix together.

2. In a large bowl, combine flour and rice flour, sugar, sesame seeds, dried yeast.  Add seaweed mixture, then mix together with your finger till it becomes hard to mix.

3. Place the dough onto the floured counter, then knead it for 10minutes till it becomes smooth and uniform. It might be stiff at first kneading. Add melted butter, and knead it for another 5minutes till it becomes elastic.


4. Put the bowl with cover into the warm place (35℃) till it becomes double size (about 1-1.5 hours )

5. Pour the dough onto floured counter, then deflate it, knead briefly. Divide into 8 pieces, make them balls roughly.  Set the dough with cover for 20 minutes.

6. Reshape them into final balls.


7. Place it into warm place with spray water, rise them for 40 minutes.

8.Meanwhile preheat the oven at 190℃.

9. Score lines on the dough with sharp knife.

10. Bake for 15-20 minutes at 190℃ or till color becomes golden.